This is part 2 of the bedroom carpet removal saga. To see how I got this far, click here for part 1 of the tutorial.
Starting out, our bedroom had wall to wall carpeting. The people who lived in the house before us kept it in immaculate condition, but it just wasn’t practical to have a carpeted bedroom with three dogs and so I decided to rip it out. As a refresher, this is what it looked like before I got to work:
And this is what it looked like after I finished laying all the planks, with some help from Matt at the very end.
All of the boards were finally down, and I was ready to add the stain. Before I did, I vacuumed the floor really well, using the nozzle to suck up any sawdust or debris that had fallen between the cracks as we were working.
After testing out a few different colors, I settled on Minwax Pickled Oak as my stain of choice. I love the look of whitewashed flooring, but using paint seemed like it would defeat the purpose of all that sanding, so this stain was a good alternative. Keeping the floors light will help camouflage any dog hair or dust (I’m a dirtbag, who cares?) and give the room the coastal vibe I was going for. I also thought that if I had stained them darker, it would result in them looking more like plywood.
To apply the stain, I used a 7.5″ Shur-Line stain applicator and it worked really well! It went on smoothly and evenly, and took no time at all to cover the floor. I did inside the closet first, and then worked my way from one side of the room to the other, going towards the door so I didn’t box myself in. It was kind of hard on my eyes because the stain is so light and made it difficult to determine where I had already applied.
The difference was subtle initially, but definitely there. Now (one week after staining) the difference is much more prominent. The stain took down any remaining ‘yellow’ tone on the planks, leaving them a natural, sun-bleached hue. I think if I’d used a paint for the white-wash, too much of the wood grain would have been covered.
I let the stain dry for a full 24 hours before adding the first coat of finish. I used Minwax Ultimate Floor Finish, because it claims it will never amber over time, making it ideal over light stains. (I swear to God, if it turns my floors yellow, I will burn this house to the ground.) I used satin because I wanted a matte finish, but it comes in gloss and semi-gloss as well.
Aside from claiming it dries (and stays) crystal clear, some other perks of this finish are that it’s soap and water clean up, low odour, you can re-coat in two hours, and no sanding between coats is required. Also, the directions state if you’re applying the finish over stain, only two coats are necessary. (I did three just because I wanted the extra protection.) I applied the finish the same way I did the stain, using a fresh Shur-Line applicator, starting in the closet and then going from one side of the room to the other. It went on so nice and smooth, and was also really quick! There was virtually no smell, and it was dry to the touch in an hour. I did one coat after work, another the next morning before work, and then the final coat the following night. Less than three days to stain and clear coat a floor is pretty great, especially for someone as impatient as me.
Even though it’s not necessary, it does say you can sand before the last coat with a fine grit paper for maximum smoothness, which I did. I used 400 grit and lightly sanded the entire floor by hand (the knee pads come in handy here) to take down any rough spots that were a result of the stain raising the wood grain. It only took me about an hour, which I think was well worth it because the floors are now as smooth as hardwood! I vacuumed the dust and applied the final coat of finish, a little more thickly than the first two.
After the floors were finished, I painted the walls and trim a nice, fresh white (it’s called Polar Bear, by Behr). I decided to paint after laying the floors because of the amount of cutting and sanding we did in the room during installation. I didn’t want any dust or debris to stick into freshly painted walls, so I waited until after the floors were down and was just suuuuuuper careful, which is very uncharacteristic of me. I laid down drop cloths and everything.
It took three coats of paint to cover the mint green, which was torture because I hate painting almost as much as I hate zits on my chin (honestly, why am I still getting zits anyways I am 32 years old wtf). Matt put all the baseboards back on for me when I was finished painting the walls, because he was super eager to get moved back into our bedroom. And also because he is a nice husband.
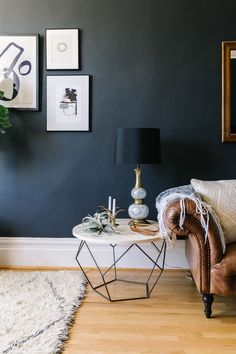
After a week and a half of hard work (plus a month of sanding!) the room is finally finished and I could not be happier with how it turned out. The floors ended up costing us about $1.27 per square foot, including the stain and finish. Under $400 for new bedroom floors? Yup, I’m pretty much tooting the shit out of my own horn right now. I honestly cannot believe what a difference there is in this room; it just feels so much bigger and brighter. I am happy as hell and can’t wait to finish the rest of the upstairs!
Even though I used satin finish, there is still a bit of a sheen to the floors when the light hits it, so I’m glad I didn’t use gloss or semi-gloss.
I put this project in the win column 100%, and will report back in a few months on how it’s wearing for my six loyal readers. You can see our entire bedroom makeover here. What do you think? Would you ever try plywood as a budget friendly flooring solution?


Floor looks amazing!!! I wish you had these tutorials up when we did renos a few years back 🙂
Looking forward to a follow-up on this one!
Thanks J Mac! I’m pretty pumped — soon I’ll hang the elephant and make all your dreams come true! 🙂
It’s absolutely beautiful…..love the look of it. Good job Allison!
Thanks Suzanne! <3
Are you available for hire? Another amazing job, Allison!
Thanks Marg! 🙂
First of all - you are freeking funny. Like, make me laugh so hard I almost woke up my husband, funny. Secondly - GREAT job on the floor. It looks amazing!!!! Thumbs up all the way around! We’re going to attempt this at our house soon. Thanks for the great tutorial and helpful tips!!! 🙂
Connie — what in the world are you doing up at 3am looking at home reno tutorials?! I thought I was the only one who did that! (We must be soul mates.) Thank you for the lovely compliment and I am so glad you like the floors! I’d love to see how yours turn out, and if you run into any issues or have any questions as you’re working on them let me know!
Very nice work! I have one question. I’ve been researching a lot of the diy plank floors, but I haven’t found any that talk about or show what happens with the transition from rooms. Since you only did you bedroom, what kind of transition piece did you use for your door into the hallway, next room, whatever?
Hi Farrah! Thanks for visiting the blog. I have done nothing (as of yet) to transition between rooms because very soon I plan on continuing the floors out into the hallway and into the other two rooms upstairs. (Currently there is just an ugly gap between the plywood floors in the bedroom and the laminate in the hallway.) However, I will have to figure out a solution for this when I do the hallway because the bathroom is Luxury Vinyl Tile. I was thinking about putting down a piece of finished pine over the seam where the two floors meet, thin enough that the bathroom door can still close and stained the same color as the plywood planks. What materials would you be transitioning between, and how big of an area: just a doorway, or?
Super job Allison! You are amazing - I LOVE your tutorials!
Thanks very much Sandra! I’m glad you enjoy the blog. 🙂
I have been reading blogs about plywood planks for almost a year! I love how they turn out looking more rustic and farmhouse (Plus you had me <$1 sqft). You did a fabulous job! The lighter stain on yours does give it more of a beachy vibe! Well done! My question is… now that you have had them for a few months, what do you think? I don't have pets but I have 3 kids so I'm curious how the cracks look with everyday wear and tear and pet debris:) Are they easy to clean? Our plan is also to start in our master bedroom and see how we like them and then transition the rest of the house. Thanks so much for sharing your tutorial!
Thank you, Kate! I was in the same boat. I pondered and researched and checked out a ton of other blogs before finally taking the plunge and going for the plywood floors myself and I can honestly say I am so glad I did. It is one of my favorite improvements to date when considering the cost, impact, and practicality. The things I worried most about prior to installation were getting splinters in bare feet or the floor feeling rough (which it doesn’t at all) and if it would look nice, which I think it does! If you have no dogs, you are golden. My dogs are seriously so hard on this floor, and there are some scratches and marks from their nails (it is pine after all) but because I stained them a really light color, you can’t tell unless you’re down on your knees really looking for them (I will post some pictures later). You can’t feel them when you’re walking on it, so you really don’t notice at all. The gaps are no big deal: I vacuum once a week (or twice if I’m really ambitious) and I don’t have any problems with dirt/pet hair getting stuck in there. I would say, though, since you do have kids I would paint the sub-floor underneath to give the added moisture protection in case of any spills. The beauty of these floors is that you won’t be scared for your kids to actually live on them, you know? They are cheap and beautiful (in my opinion) so you really can’t go wrong. I hope that helps! If you have any further questions I’d be happy to chat. Good luck!
Thanks! I can’t wait to get started!
I LOVE the way these turned out! I was thinking of doing this in my bedroom. I have a dog, and she likes to pee on floors when she’s mad, and I’m just worried that I’ll come home one day and I will have to rip up all that work because of her. Any suggestions as to how I could seal it better? Or maybe putting them close together would help?
Hi Kayla: thanks for your comment! I did worry about this too, to be honest. My dogs aren’t spite pee’ers per se, but there is the odd accident. I think if you painted the sub-floor underneath and eliminated the gaps (I have seen other tutorials who did not gap their boards and had no issues with buckling) you would be ok. Also, using the liquid nails as well as nailing them to the floor might also lessen the chance that any accidents would seep underneath the actual boards. You could also use Waterlox sealer instead of the Minwax. I used it on my bathroom counters and I am telling you that stuff is impenetrable. A little more expensive, but worth it if you are really worried about your pup damaging the floors! Sorry I can’t be more helpful — good luck!
You are funny! Nice work!
Thanks, Lauren! Glad someone thinks so. 😉
I am hoping to do this in my guest room. Your tutorial made laugh and feel a tad more confident!
Thanks Fee!! You can totally do it — let me know if you have any questions along the way!
This is such a great post(s). My husband and I are buying our first home and one thing we want to change when we get in is the carpet. It’s got to go. We both really want hardwood floors, but the price is so high. So I’m really glad that I stumbled upon this as I will no be digging into some more research about plywood flooring. Thanks!
Thank you Alexandra! I am so happy people are finding this helpful. If you guys decide to tackle this project and have any questions along the way, let me know!