***I would like to preface this post by saying that I am not a contractor, and this is not meant to be a “how to” for anyone wishing to take down load bearing walls in their home. This is what we did, with (a lot of) help from an experienced builder who knows his shit. Please do not go taking down walls in your home without first consulting a professional.
Our kitchen was dark. Darker than my very soul. After we moved in, I started making comments here and there about how nice it would be to open up the wall separating the kitchen and the living room to let a little light in. Matt ignored the comments and the status quo was maintained.
Fast forward to July. We’d been in the house about eight months, and Matt’s Dad and step-mom, Henry and Chrissy, were coming for a visit from Ottawa. Something you should know about Matt’s dad Henry is that he is handy AF. Naturally, the wheels started spinning, but unfortunately, Matt knows me really well. Too well.
“Do not mention that wall opening to my Dad, Allison.” He uses my full name when he is trying to be #serious. I told him that I wouldn’t, but secretly had my fingers crossed behind my back. We all know this is the binding key to getting out trouble for doing something that you said you wouldn’t do. The secret finger cross. Works EVERY time.
I swear to Buddha, I did not mention the wall opening to Henry hoping he would offer to do it. I swear. I just wanted to get his advice and thoughts and for him to lay out step by step what we needed to do, because I didn’t want our house to collapse. So we all stood around the kitchen and Henry explained what we would need to do, and how we needed to do it, as Matt gave me the death stare. (The death stare is closely related to the Death Star, but instead of being a space station with the ability to destroy an entire planet, it’s a facial expression with the ability to do not much of anything, like shuttin’ up the lady folk.)
Anyway, I had written down everything Henry said and figured that we would get around to doing it never because this wasn’t something I would do/could do/should do by myself and Matt’s video-game schedule was looking pretty full up for the next few months. So I filed it away in the “wishful thinking” project pile and went on my merry way.
The next morning Matt was getting ready to golf with his Dad and said that they were going to stop by Homedepot on the way back to get the stuff for the wall, as Henry figured we should get it done while he was here to guide us/help and I was just like

God bless you, Henry.
And that was that. While they were golfing I prepped the kitchen wall by removing the chair rail and baseboard, and when they got home we decided the best placement for the opening. We settled on having it centered on the living room wall side (because you’d see it as soon as you walk in) and to line the top of the opening up with the dining room opening for consistency.
The first thing they did was measure out where they needed to cut the dry wall. On the kitchen side it would need to come off all the way to the floor so they could frame out the opening properly, but on the living room side the only drywall needing to be removed was the actual opening.

Next, they had to position some 2x4s to support the second floor while they were working.


They did this on both the kitchen and living room side.
I wanted the bottom of the opening to be a tiny bit higher than counter height (which is roughly 35 inches) so Henry measured and cut the existing 2×4 support studs accordingly (accounting for the height the 2×4 sill plate would add) with our reciprocating saw, and then did the same to the top. This allowed him to remove the pieces of existing stud from where the opening would go. He did all of this without damaging the dry wall on the other side. Witchcraft…

Then he removed the rest of the dry wall on the living room side.


Next was the most important part: adding in all of the new support studs and header beam to make sure the ceiling didn’t collapse. They added 2×4 studs on either side of the opening (jacks), a 2×4 across the bottom of the opening (sill plate) and a 2×8 beam going all the way across the top (header).

Watching them do all that work was exhausting, but it took a lot less time than I thought it would: about four hours total. I am so glad we had Henry there when we tackled this project. Messing around with framing and support structures really isn’t something you want to be “dabbling” in, so having him do all the work teach us how to do it properly was really comforting. When we said goodbye to them I promised that next time they visited we wouldn’t make them do any work (crossing my fingers behind my back again).
Matt put up the new dry wall for me the next weekend (he is a dry wall whiz kid — it’s what made me fall in love with him) so I could trim out the opening.
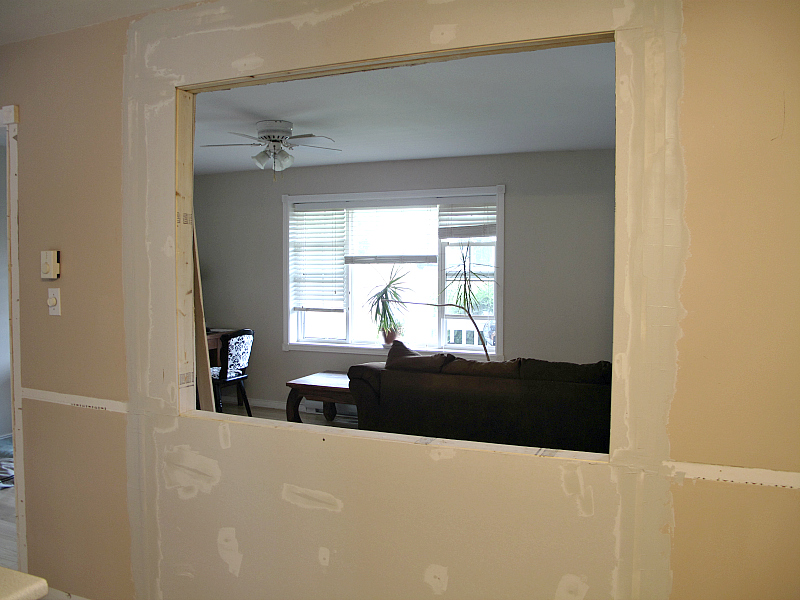
And there you have it: turns out putting an opening into a load bearing wall without bringing the house down isn’t as hard as you’d think as long as your father in law’s handyman skills are #onpoint. In the next post I’ll show how I trimmed out the opening and added a breakfast bar — stay tuned!




[…] bar” post to the wall-opening project we tackled earlier this summer. You can see the details here, or just keep reading to get to the good […]